
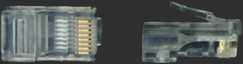
Ethernet CablesEthernet networks are a wonderful thing... and crimping your own cables can save time, money, and frustration. Okay, it might bring you a little frustration. The process involved is fairly simple and I'll take you through the steps. The place to start with crimping cables would be to acquire the appropriate parts and tools. You'll need: RJ-45 connectors:
For cabling, you will need Category 5 or 5e Unshielded Twisted Pair (UTP) data cable. If you plan on running your wire through or around air ducts, get plenum rated cable or you might end up killing people in the event of a fire. Yep, PVC jacketing + fire = chlorine gas = death. Something like that anyway... Fun, eh? Highly important to the project, an RJ-45 supporting crimp tool:
There are many types of crimp tools out there. It is worth noting that, if you're not going to install cabling for a living, you can get a pretty good tool for around $20. Internet sites often have very good deals on low end networking tools. If you plan on a career in cable crimping, buy the most expensive one you can find. Even if your cables don't turn out well, at least your cable making friends and colleagues will envy you. Crimp tools that support die sets are wonderful. Just incase you decide you want to crimp some phone line, television cable, or other crimpable cable, buying a new die set for an expensive tool can be around as much as buying a single really low quality tool for the same purpose. If your crimp tool doesn't have a wire stripper included, you'll need one or at least some sort of sharp object for cutting the outer jacketing of the cable. Hobby knives, shop scissors, you name it... if it's sharp and pointy, it'll probably work. I'd recommend not using your teeth though. I really hope I didn't have to tell you that. Okay, you have your equipment, accessories, ethereal music playing in the background, work bench covered in half empty cans of flat soda, beads of solder, and a pile of junk that resembles the makings of some network cable in front of you. What's next? Crimping! What else? It would be a good idea to determine what kind of cable you would like to at this point. If you plan on making a normal network cable that'll be used to attach a computer to a hub, switch, or other piece of network equipment, you'll want to make a straight-through cable.
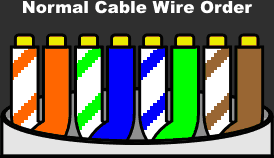
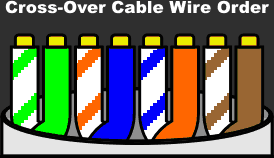
The above image is the proper color layout for both ends of such a cable. If you were wanting to make a cross-over cable for uplinking routers, switches, hubs, or just connecting one computer directly to another, you'll want to use one of these ends and have the other use the alternate layout.
When you crimp your cable, the insulation on the individual wires will be pierced by tiny (hopefully gold) blades in the connector. That means you DO NOT need to strip any insullation off of the small wires, just the outer jacket. Furthermore, the outer jacketing will be pinched by part of the connector and held firmly in place. Since this pinching will add durability to your connection, you need to cut only just enough off: 4/10ths of an inch from the end of the inner pairs is perfect! (If you really care, the more insulation you leave, the less RF interference will be able to penetrate your wire). Very carefully arrange the wires in the correct color-coded order while trying to not un-twist too much. The twisting of the pairs of wires allows the cable to function properly and removing too much twist will make your cable an UNHAPPY cable. If you thought you were having fun, you were wrong! You're only having fun when you're trying to cram (that's not a technical term as far as I know, but it's what you'll be doing) the wires into the connector. The prong part of the connector should be facing away from you with the open end facing down. That'll make the color-coded diagram above serve its purpose successfully. Once you have every one of the eight wires pushed all the way in to their respective positions and each wire is touching or very very close to touching the end of the connector, you're ready to crimp. If something doesn't look quite right, keep cutting and trying until you get it right. If you mess this up, you'll have to cut the end off and start over! That in mind, hold the wire firmly in the connector, place the uncrimped thing into your crimp tool and, without letting go of anything, squeeze the handle until it cannot be squeezed any more. If you happen to have a ratcheting crimp tool, the ratchet will release when you're done with the squeezing part. Crimp complete! Inspect your end to make sure it looks perfect, colors in their correct places, etc. Don't break out the snack food just yet, you still have to crimp another end. Yes, a proper network cable has two ends to it. It's just the way things are, get over it. Just follow the same steps on the opposite end and all will be well. Unless you messed things up and didn't realize it. Try the cable, see if it works. If you have an expensive wire tester, use it!
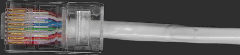
If you're really cheap, get a battery and some LED's. Make sure that your wire works in whatever way you want... or just plug it in and see if you get any errors. Once you're good at this, you can probably just assume they work and hope nothing goes noticeably wrong. Wait... that's really bad advice... Forget I said it. Finished network cable:
By the way, you shouldn't make network cables shorter than 3 feet. I think it'll cause the world to end if you do. Either that or it'll cause some sort of signal attenuation or something and bring the wrath [insert name of angry deity/IT manager/boss/customer here] to make your life miserable. Oh yeah, quick note: If you ruin your cable, click back to the table of contents for this section and take a look at the RJ-45 Monster. Why throw the end away when you can have one of those! Happy networking! |


Copyright © 2001-2005, James Aswell. All Rights Reserved.
